Saturday, April 14, 2018

Opening the cube

So recently I bought the hackcube and in this blog series I write about my findings of the hackcube. What exactly is inside the cube? How do the internals look? That is what this blog post will be about.

Let's start the the cube itself. Of course it is a cube, with the logo on it:
There is a small switch on one of the sides which open the panel for the connectors.  
The top slot is for the GPIO connectors of the Raspberry PI. The slot containing 2 USB ports probably are the Pi's aswell, but have yet to confirm that. The microusb port with the two leds on the side is the main power feed. The microusb port with only one led and a switch is also a power feed, but behind that is also a slot for a battery. The empty one is where the NFC antenna is located.

Opening the box is quite complicated because everything is quite tight. First thing first, remove all the 'facing' with a suction cup.

Now remove the led board by unscrewing the two screws and lifting it up a bit and pulling it out.

Now push out the GPIO board a tiny bit like the picture below. Also push out the Raspberry Pi board. Both the GPIO and Raspberry Pi board need to be moved out at the same time! It is quite hard to push them out, because the housing is quite narrow and tight.

After that you are able to push out all the other boards. Except for the last one, don't push out the last slot. You are not able to get that one out without damaging it!


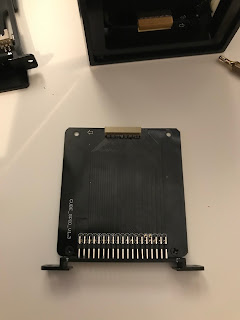
Some pictures of all of the boards, first the GPIO board
Next the Raspberry Pi board:
The micro usb port board, containing the 433 mhz and other RF communication chips
The other microusb port board, as you can see, their is space left for a battery:
And the almost empty housing:
So, if we look at the board what kind of hardware do we have?
  • Raspberry Pi Zero
    • With Samsung MicroSD 16GB
    • Fn Link 6222D (RTL8822BU), WiFi chipset for 2.4Ghz and 5Ghz
  • Arduino Micro Pro
    • CC1011 Wireless transmitter (387-464 Mhz)
    • NRF24L01 Wireless transmitter (2.4 Ghz)
    • EM4095 125Khz RFID
    • PN532 13,56Mhz RFID
That is all of the important hardware.

Thursday, April 12, 2018

Small test with the Hackcube

Today I went to Hack-in-the-Box in Amsterdam and bought a Hackcube there.

https://conference.hitb.org/hitbsecconf2018ams/sessions/hitb-lab-wireless-hacking-with-hackcube/

The device is really cool, regarding hardware. It contains a Raspberry Pi, Arduino, 2.4 and 5 GHz Wifi chip, RFID capabilities (125 KHz and 13,56 MHz), 433 MHz and RuberDucky by default. Because they made the USB ports available you can add a SDR adaptor to the device and use SDR on the device.

When first booting the device it will broadcast the WiFi name and a small part of the MAC of the WiFi. You can connect to the device with the default password: 'hackcube12'. Once connected the Raspberry Pi running Kali is available at: 192.168.2.3. Usename is root and password is hackcube.

It also run nginx and host a small web application. Which offer some capabilities, but those are quite buggy. The software is OpenSource, but to what extent it is Opensources (are all the Firmwares opensource?) is not clear yet. (this is a very pre-Alpha build still). From the Webapplication you are able to interact with: WiFi, 'NFC' (RFID), RFI (433 MHz) and HID injection. I was not able to get all of the functions working, but most of the demo stuff seems to be working.

The source code will be made available at https://github.com/UnicornTeam/hackcube
Also see https://github.com/unicornteam1/HackCube for more information.

On this blog I will write more about the device and research how it exactly works and how it is built. It really looks like a nice hardware concept, let see what this project brings us in the future!